One way to build your GraphQL server with TypeScript
As part of some of my side-projects I have been working on an autoparts catalog.
I enjoy working on the project because integrating new logic to it is pretty straight forward, I dont have to mess with other components logic given that each transaction (queries and mutations) is defined separately in its own file.
Given that I’m using a Code First approach instead of a SDL First approach, I don’t have to worry about regenerating the schema on every resolver or type change in the code, the schema is generated whenver the server is initialized from resolvers and types defintions automatically.
Context About the Project
If you havent seen an autoparts catalog before, imagine every single car out there, think about their components.
Just so you can visualize it better, a single car has around 30.000 parts.
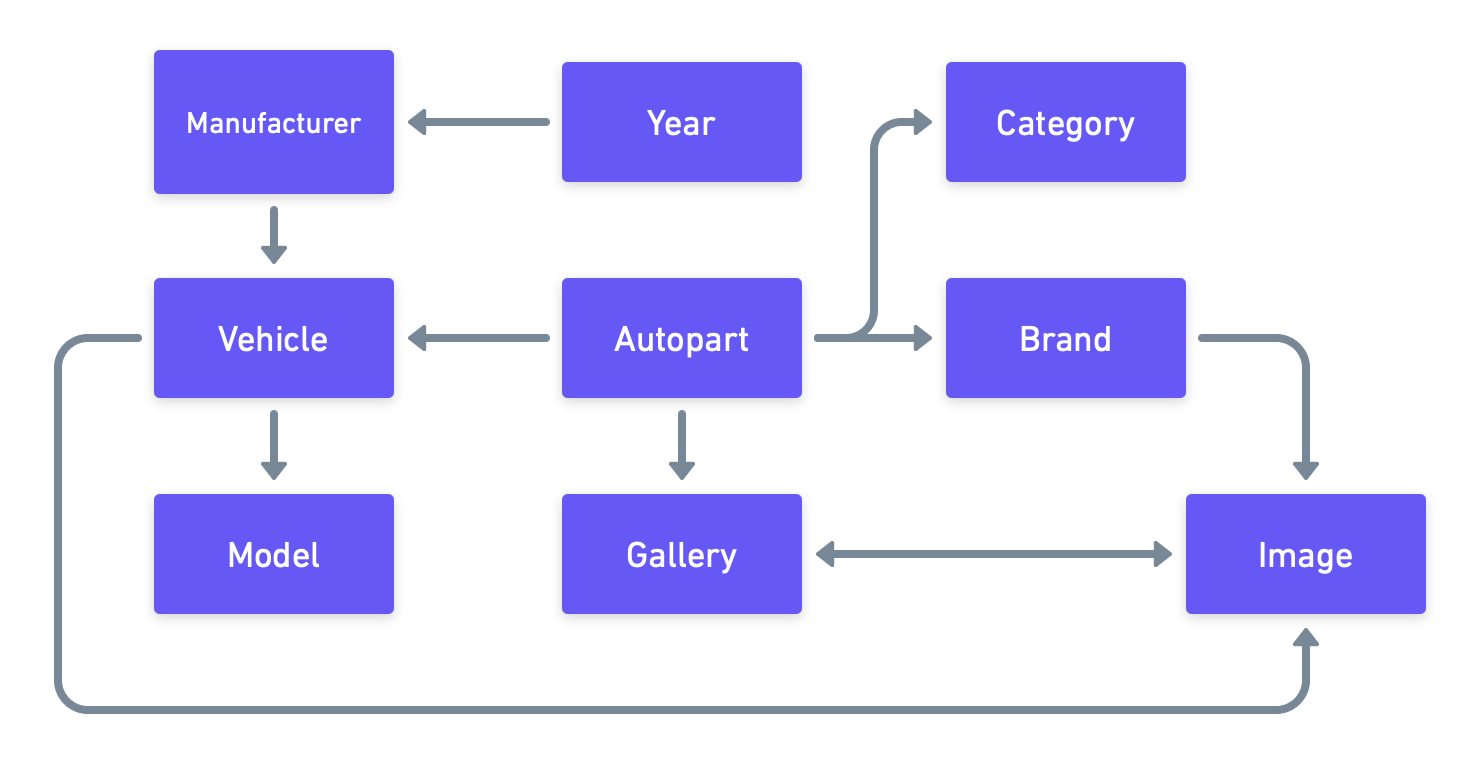
Some parts are compatible with different models from the same vehicle line. Based on details such as manufacturer, vehicle’s year of release, vehicle’s engine details including cylinders and engine capacity and country of origin (just to name a few), an autopart may or may not fit into a multiple vehicle models.
The following diagram shows some of the entities involved:
About the Codebase
The solution is written using TypeScript and runs on NodeJS. Some of the fundamental libraries include:
Fastify: Performant and very easy to use HTTP Server Framework. Fastify has a great and mature community with lots of solutions to install for your project.
TypeORM: Mature and feature rich ORM for TypeScript with support for multiple database engines
Mercurius: Fastify plugin to support GraphQL on Fastify Servers
TypeGraphQL: Library with abstactions for GraphQL primitives. Allows you to build your GraphQL schema using a Code First approach instead of using a SDL First approach.
Class Validator: Validation decorators for class fields. This package gets very well with TypeORM and Type GraphQL. Given that most of the code I write in this project involves implementing classes I decided to go with this library.
Sometimes working on this project feels like I’m writing a Python’s Django HTTP server. I find myself constantly extending classes to define domain entities (models), applying decorators and using the active record pattern.
Talk is cheap, show me the code

Just as Linus Torvads said, it’s easy to speak but its also important to encourage yourself to do things.
Even though I share some of the entities involved in the project above, I will
focus on the User entity for this note. This is because is the most intuitive
and well know entity any application has. And because going through each of the
entities above would take lots of time.
The application files are distributed in 3 important directories:
Application: Interface related files, given that this is a GraphQL server, in this directory relies the schema definition and GraphQL scalars (also know as types).
Domain: Defitions for domain entities. Here I define classes that are decorated with TypeORM’s
@Entitydecorator.Infrastructure: Includes all the utilities and helpers for application implementation, contents of this directory doesn’t define any domain or interface related behavior.
I know, It sounds pretty much like Domain-Driven-Design but super simplified. It is because I’m a fan of the pattern but I tend to use certain concepts and go into a more canonical implementation as I see fit.
What I usually do when I’m working on a new feature in this project is create
the domain entity for TypeORM, so I go to the domain directory, and I create
a file with the name of the entity following the same convention Java uses for
class files.
In Java, you have to name files using the pascal-case casing, the name of the file must match the name of the class being defined.
// domain/User.ts

import { IsEmail, IsPhoneNumber } from 'class-validator';
import {
  Entity,
  PrimaryGeneratedColumn,
  Column,
} from 'typeorm';

import { BaseModel } from '../infrastructure/BaseModel';
import { Image } from './Image';

export enum UserRole {
  Admin = 'ADMIN',
  Staff = 'STAFF',
  Basic = 'BASIC',
}

@Entity()
export class User extends BaseModel {
  @PrimaryGeneratedColumn('uuid')
  id: string;

  @Column({ length: 100 })
  firstName: string;

  @Column({ length: 100 })
  lastName: string;

  @Column({ length: 100, unique: true })
  @IsEmail()
  email: string;

  @Column({ length: 100, unique: true })
  @IsPhoneNumber()
  phone: string;

  @Column({ type: 'boolean', default: false })
  isActive: boolean;

  @Column({
    type: 'enum',
    enum: UserRole,
    default: UserRole.Basic,
  })
  role: UserRole;
}
What I like from TypeORM is that defnining entities is pretty straight forward,
you just have to create a class, and decorate it with the @Entity decorator,
by doing this you will have lots of mehtods available when importing your module
in your project.
Also notice the decorators introduced by class-validator, @IsEmail and @IsPhoneNumber. Whenever a value is assigned to either the email or phone fields, a validation will be performed against the value.
This is helpful when creating any instances of User which is done when
you want to insert a new User entry into the database. Same goes for assigning
a new value for an existing entity.
If you are curious about the BaseModel import, basically its a class that
intropduces the createdAt and updatedAt fields for the model.
// infrastructure/BaseModel
import { BaseEntity, CreateDateColumn, UpdateDateColumn } from 'typeorm';

export class BaseModel extends BaseEntity {
  @CreateDateColumn({
    type: 'timestamp',
    default: () => 'CURRENT_TIMESTAMP(6)',
  })
  public createdAt: Date;

  @UpdateDateColumn({
    type: 'timestamp',
    default: () => 'CURRENT_TIMESTAMP(6)',
    onUpdate: 'CURRENT_TIMESTAMP(6)',
  })
  public updatedAt: Date;
}
With the entity defined in a file, we can move into defining our GraphQL
schema. For this I’m using the great library Type GraphQL. What I love from
using this library is that I can keep all of my codebase in TypeScript, I can
also use decorators from class-validator in my GraphQL types. Type GraphQL
also provides support for authorization out of the box which comes pretty handy
when you want to implement some kind of permissions system for your application.
Mercurius provides a section in it’s documentation to walk you through integrating Type GraphQL with your Fastify/Mercurius server.
To introduce the GraphQL schema in my project, I have created a graphql directory inside of the application directory. In there resolvers are added
to the schema by providing their definitions to the resolvers array and also
the aunthentication logic required to perform authorization tasks at the moment
of receiving external requests.
// application/graphql/index.ts
import { buildSchema } from 'type-graphql';

import { authChecker } from '../../infrastructure/auth';
import { User } from '../../domain/User';
import { UserMutation } from './users';

export async function makeSchema(): Promise<any> {
  return await buildSchema({
    resolvers: [...UserMutation],
    authChecker,
  });
}
Inside of the graphql directory previously mentioned, along with the index.ts file introduced above, modules to keep each domain entity schema
definitions relies. For instance, given that the User is a domain entity,
a user directory exists under graphql directory, which has definitions for
user related mutations, queries and types.
Defining types with Type GraphQL is actually pretty similar to defining entities
with TypeORM. All you have to do is decorate classes using it’s decorators as
shown in the example below for the User entity.
// application/graphql/user/types.ts

import { Field, ObjectType, registerEnumType } from 'type-graphql';

import * as models from '../../../domain';

// Error codes related to `User` entity mutations
export enum UserErrorCode {
  ALREADY_EXISTS,
  INVALID_CREDENTIALS,
  NOT_FOUND,
}

registerEnumType(UserErrorCode, {
  name: 'UserErrorCode',
  description: 'Error codes for User related operations',
});

// An error description type
@ObjectType({ description: 'User transaction related error' })
export class UserError {
  @Field(() => UserErrorCode)
  code: UserErrorCode;

  @Field()
  message: string;
}

// Implementation of the user type, here we decide what to expose to the
// consumer through our GraphQL server
@ObjectType({ description: 'Object representing a platform User' })
export class User {
  @Field()
  id: string;

  @Field()
  firstName: string;

  @Field()
  lastName: string;

  @Field()
  email: string;

  @Field()
  phone: string;

  @Field()
  isActive: boolean;

  @Field()
  createdAt: Date;

  @Field()
  updatedAt: Date;
}
The types defined above are added to the schema as we use them in some of our resolvers. Based on previous experiences working with the SDL First approach, I had to update the GraphQL schema by hand on a separate file, usually known as the schema file, and then, update my resolver accordingly.
Instead with Type GraphQL, the schema is built from my resolvers and types involved, this way I never have an out of date schema nor resolver.
Let’s see how a mutation looks like with this stack.
// application/graphql/user/mutations/UserCreate.ts

import { MaxLength } from 'class-validator';
import {
  Field,
  Resolver,
  Mutation,
  InputType,
  Arg,
  ObjectType,
  Authorized,
} from 'type-graphql';
import { QueryFailedError } from 'typeorm';

import * as models from '../../../../../domain/User';
import { User, UserError, UserErrorCode } from '../types';

// Defines the type to be returned from this mutation
@ObjectType({ description: 'Result from `userCreate` mutation' })
export class UserCreate {
  @Field(() => User, { nullable: true })
  user: User;

  @Field(() => UserError, { nullable: true })
  error: UserError;
}

// Defines an input to be received when consuming the mutation
@InputType()
export class UserCreateInput {
  @Field()
  @MaxLength(100)
  firstName: string;

  @Field()
  @MaxLength(100)
  lastName: string;

  @Field()
  @MaxLength(100)
  email: string;

  @Field()
  @MaxLength(100)
  phone: string;
}

// Defines the behavior of the actual resolver
@Resolver()
export class UserCreateMutation {
  @Authorized(models.UserRole.Admin)
  @Mutation(() => UserCreate, { nullable: false })
  async userCreate(
    @Arg('input') userCreateInput: UserCreateInput
  ): Promise<UserCreate> {
    try {
      const user = new models.User();

      user.firstName = userCreateInput.firstName;
      user.lastName = userCreateInput.lastName;
      user.email = userCreateInput.email;
      user.phone = userCreateInput.phone;
      user.role = models.UserRole.Staff;
      user.isActive = false;

      await user.save();

      return { user, error: null };
    } catch (error) {
      if (error instanceof QueryFailedError) {
        if (error.driverError.code === '23505') {
          return {
            user: null,
            error: {
              code: UserErrorCode.ALREADY_EXISTS,
              message: `One of the identity values provided already exists.`,
            },
          };
        }
      }

      // Handle errors somehow, and remember to send to Sentry or your favorite
      // error reporting tool if the error can't be handled! Be with your users!
    }
  }
}
Finally we defined our mutation, this mutation expects to receive certain details from a user to be created in our database. Theres some aspects I would like to review from this, because basically all we have seen so far was intended to achieve this.
The logic to register a user in the application in a single place. If one of our team mates, or ourselves wants to find the logic involved in user creation, you just have to look for the file with the same name as the mutation.
Given that this codebase has a single purpose, I don’t have to split domain logic from use cases. So I provide this logic direcly in the mutation body. If I happen to have other interfaces using this code, say a CLI for instance, I would have to think about reusable code patterns to have the same logic being performed in different places, but as of today is not necessary.
You can also see that adding another mutation is a matter of creating another file under the same directory and define the desired logic there, without having to change contents from the user registering mutation file. All the context for each operation relies in a single place where matters and is not splitted in different files.
I really hope you like this note, I wanted to share some structure I have been working on which I feel very happy with.
Thanks for reading and have a happy coding!